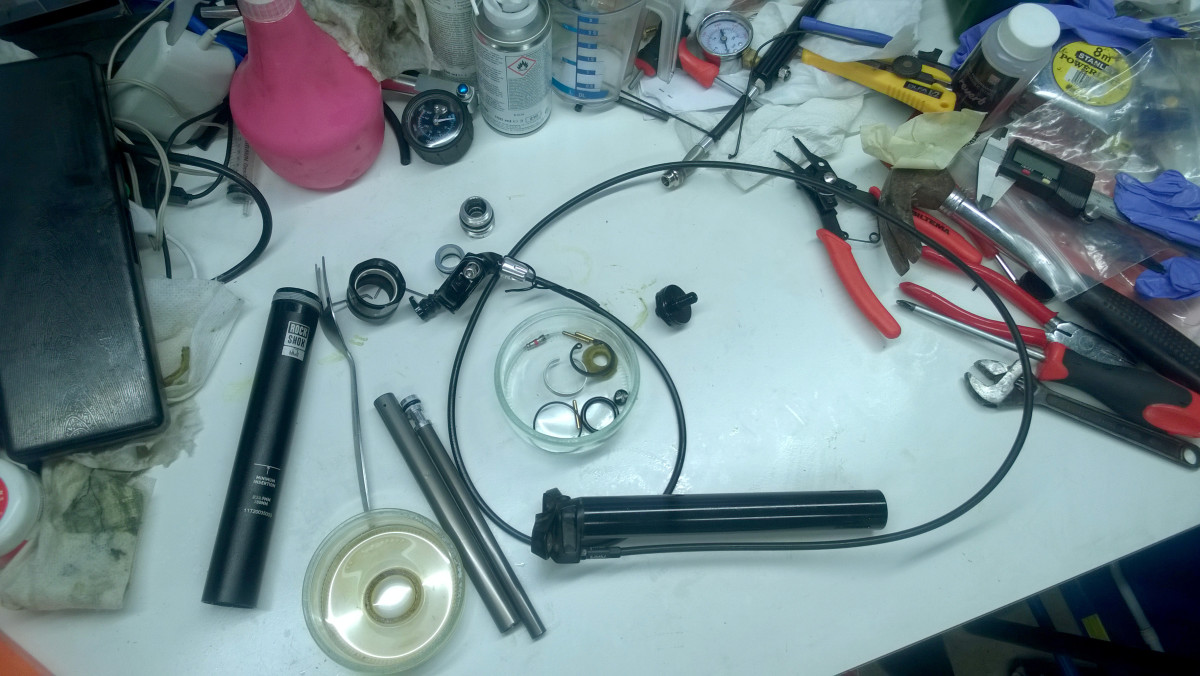
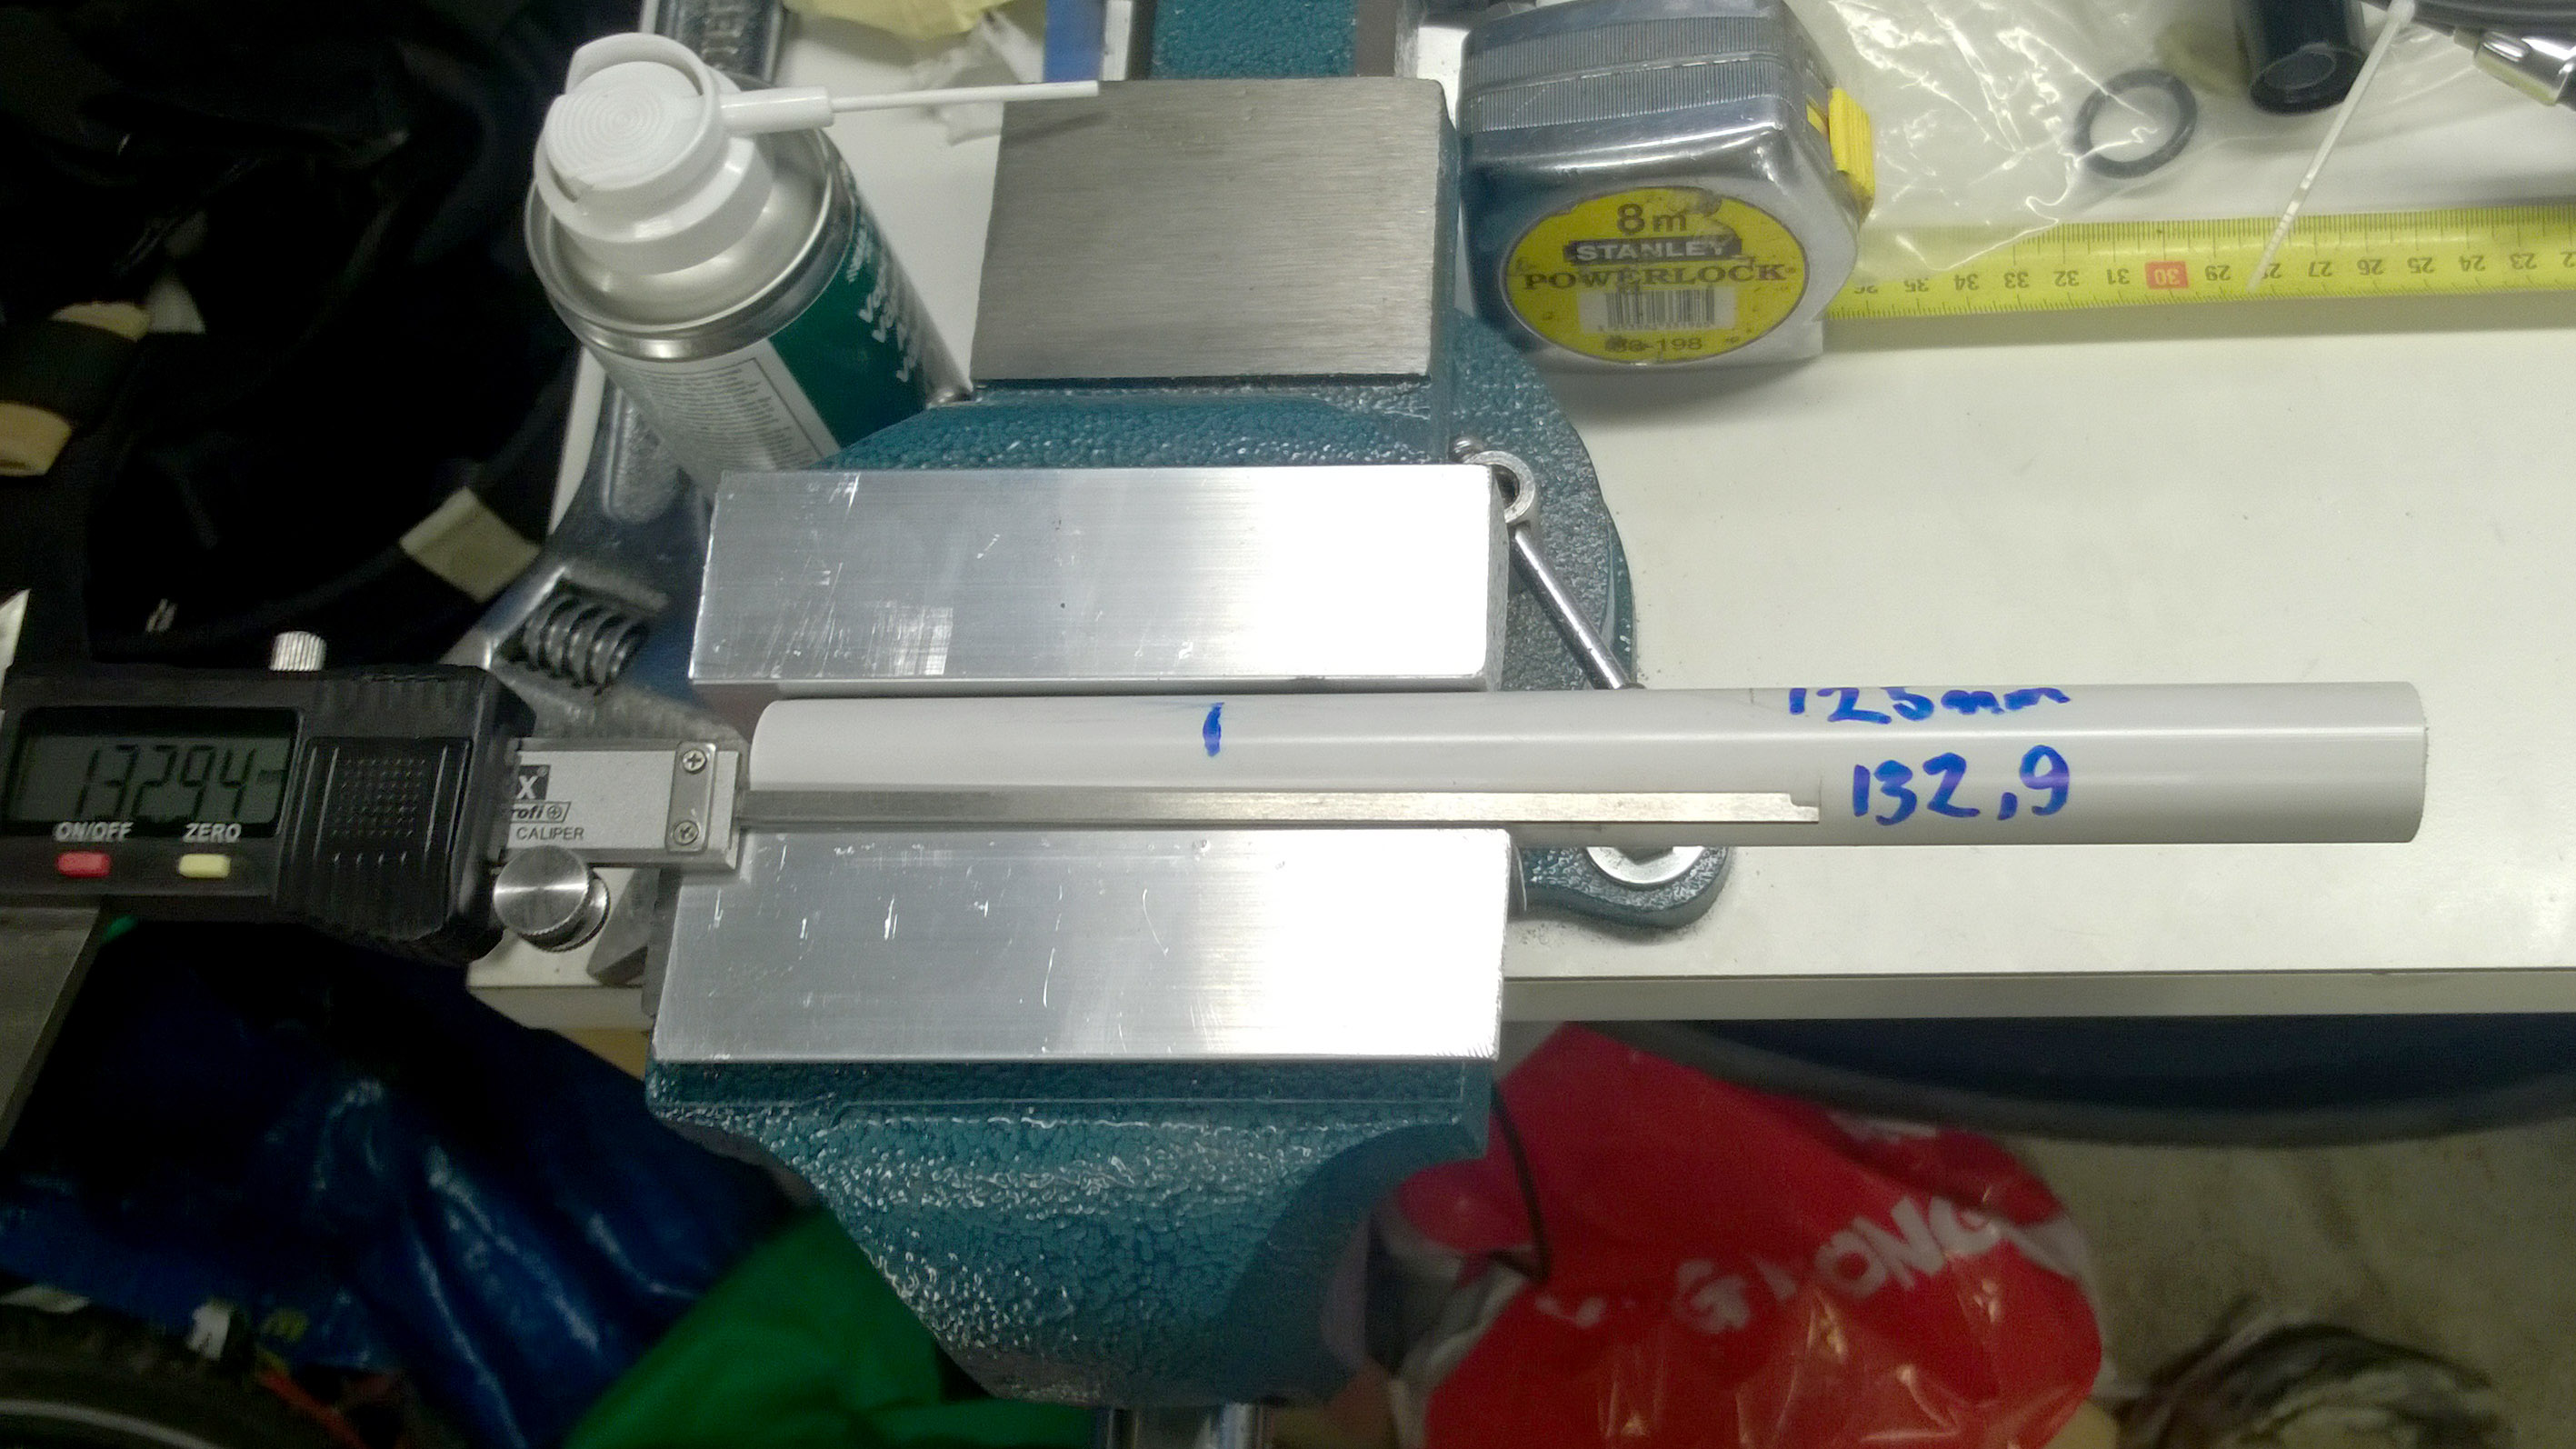
I have a 125mm RockShox Reverb (A1) in my Enduro bike. The bike was bought second hand and the Reverb had some sag and extended easily if bike was lifted from the saddle. So it was clearly in need for full rebuild but I was lazy and kept riding as it still mostly worked.
Then came winter weather with -10 degrees C, which was enough for the Reverb in its current condition and it didn’t stay up anymore. At home I took it from the bike and it had leaked oil (or something similar but more gooey) under it, no use trying to fix it by pumping more air.
Fortunately RockShox has quite good guide for fully servicing the Reverb, but unfortunately those are only in video for the non-shadow model.
- Part 1: Taking apart https://www.youtube.com/watch?v=XxgUK3gC_Fk
- Part 2: Seals https://www.youtube.com/watch?v=w65kpbuxKP4
- Part 3: Bleeding https://www.youtube.com/watch?v=rbHc4V6Ei14
- Part 4: Reassembly https://www.youtube.com/watch?v=KAmhSLir8hY
The video is not the best format to take with you to the garage, so I made a step by step manual, based on the videos by taking screenshots of them: RockShox_Reverb_Rebuild_rev1.pdf (This guide is like RockShox meant the bleed to go, the tool-less bleed chapter is in other document)
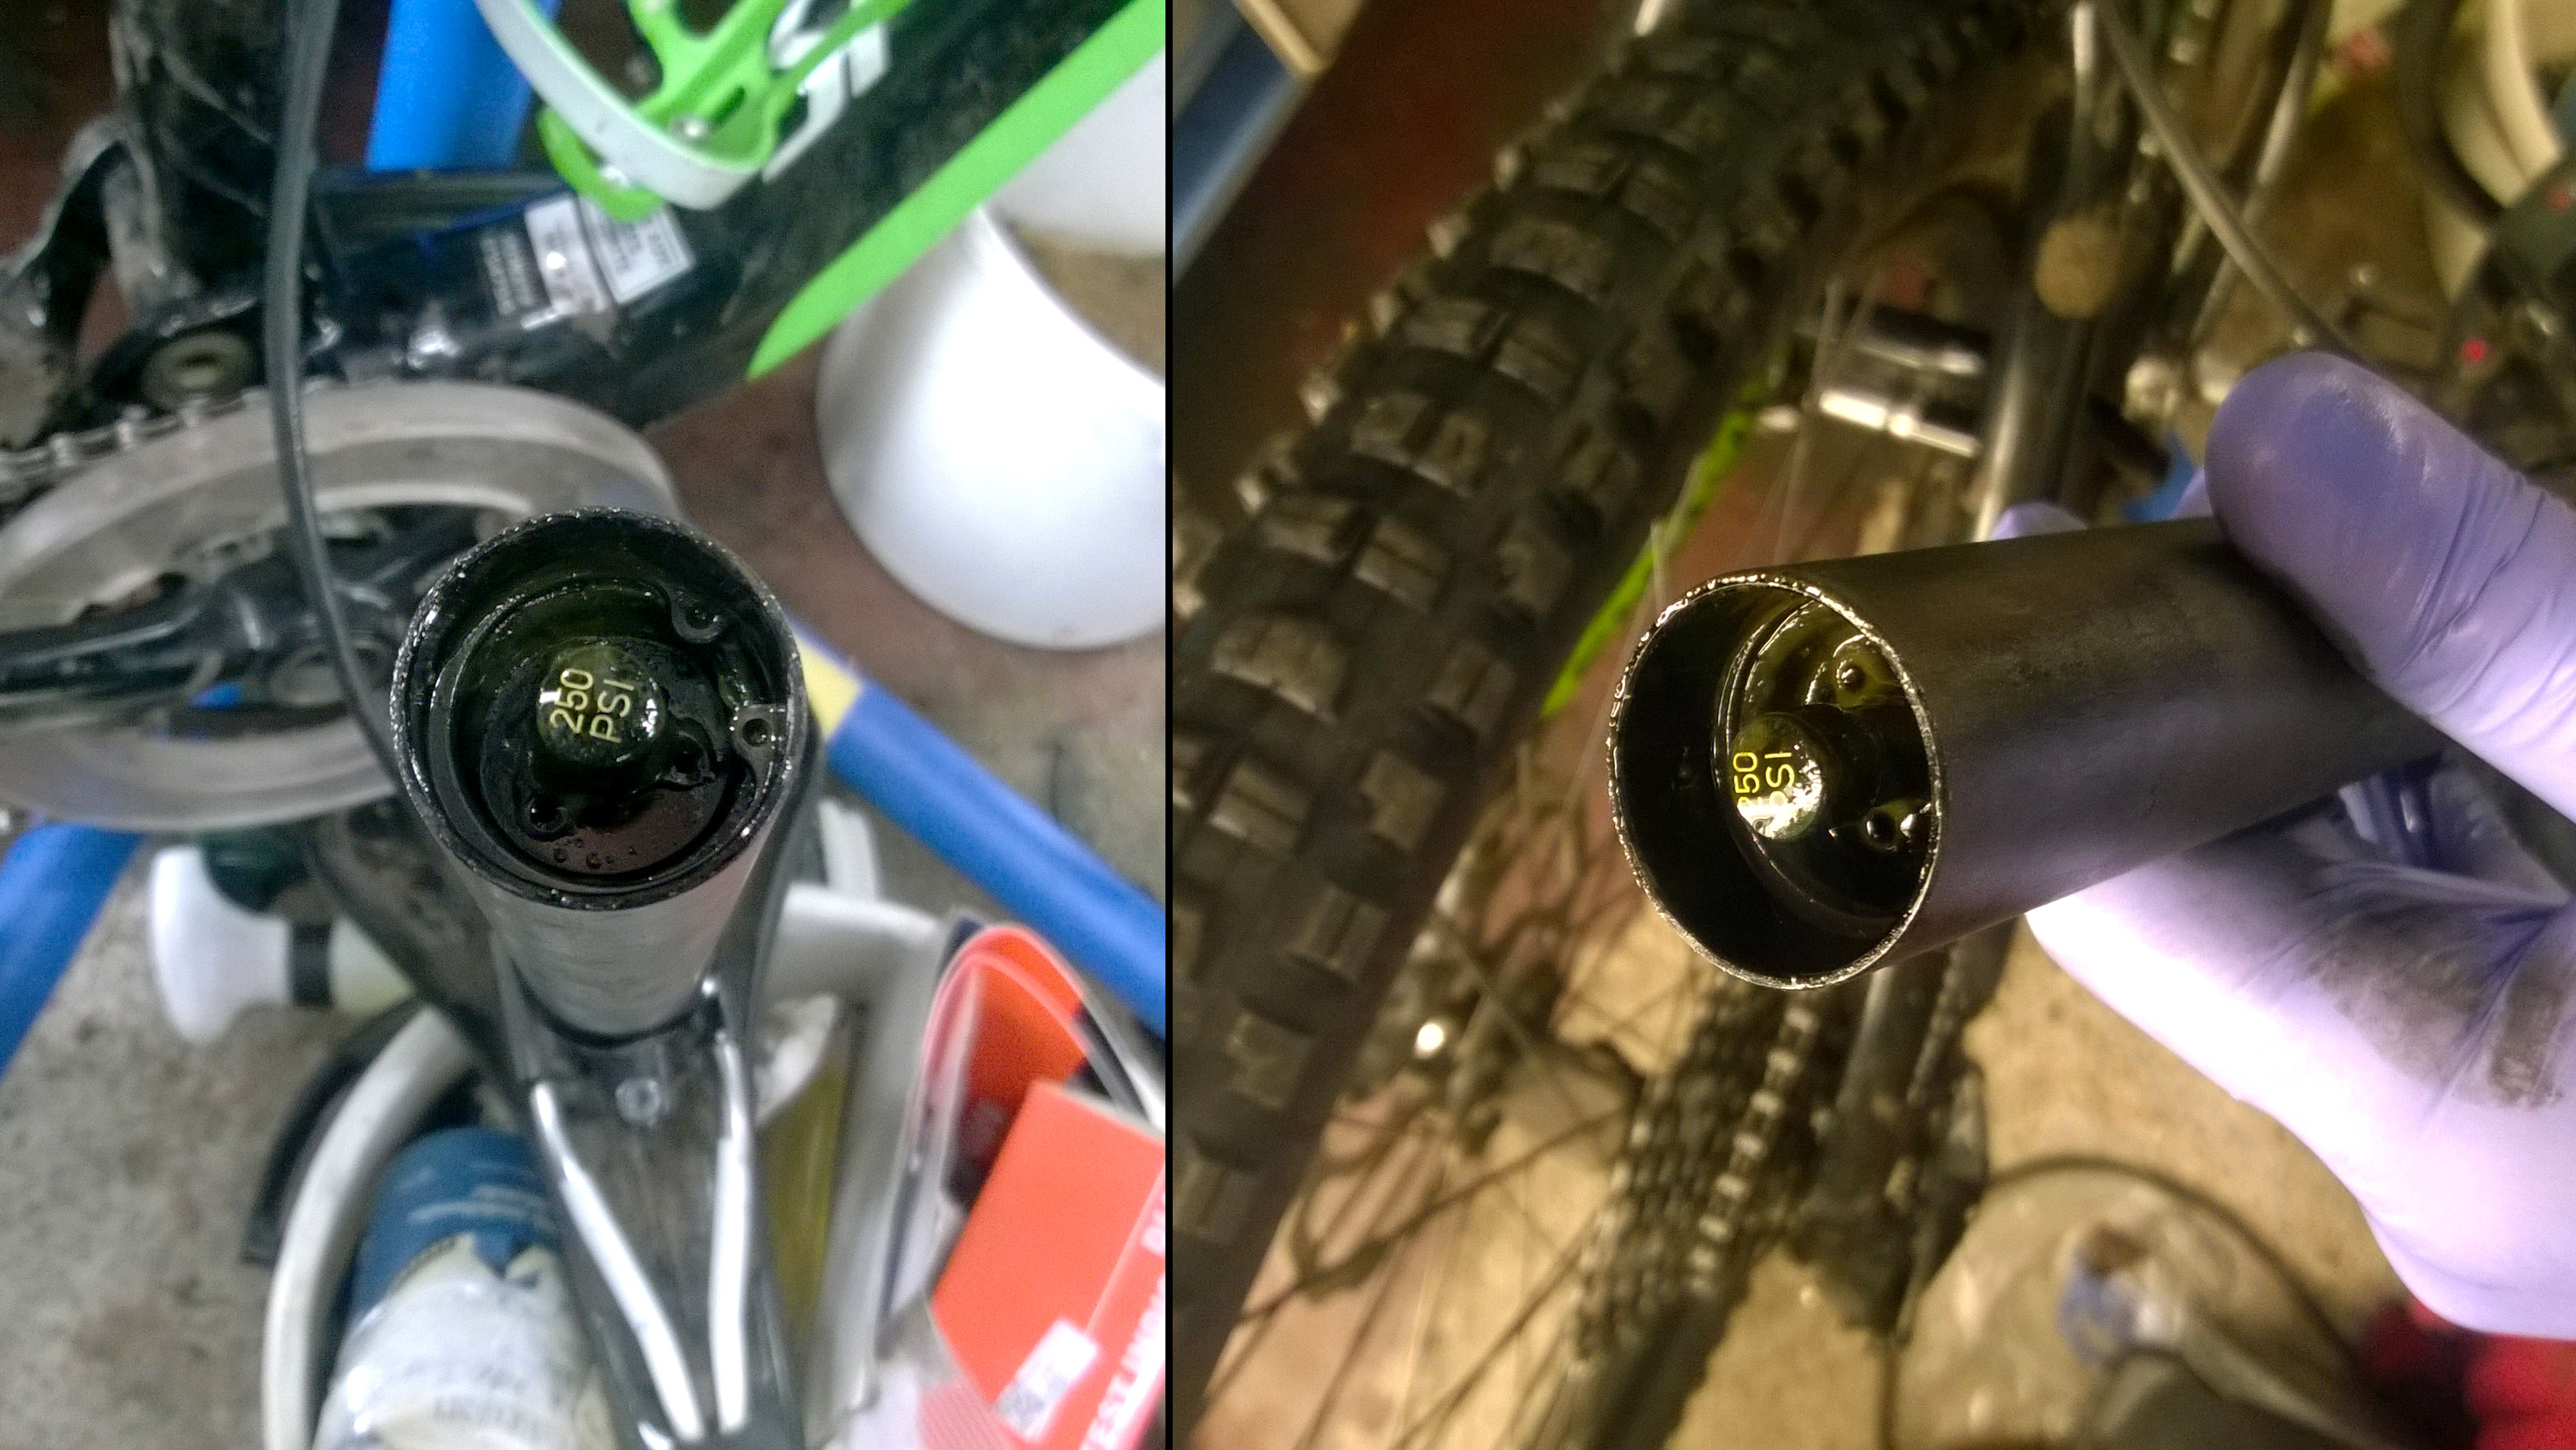
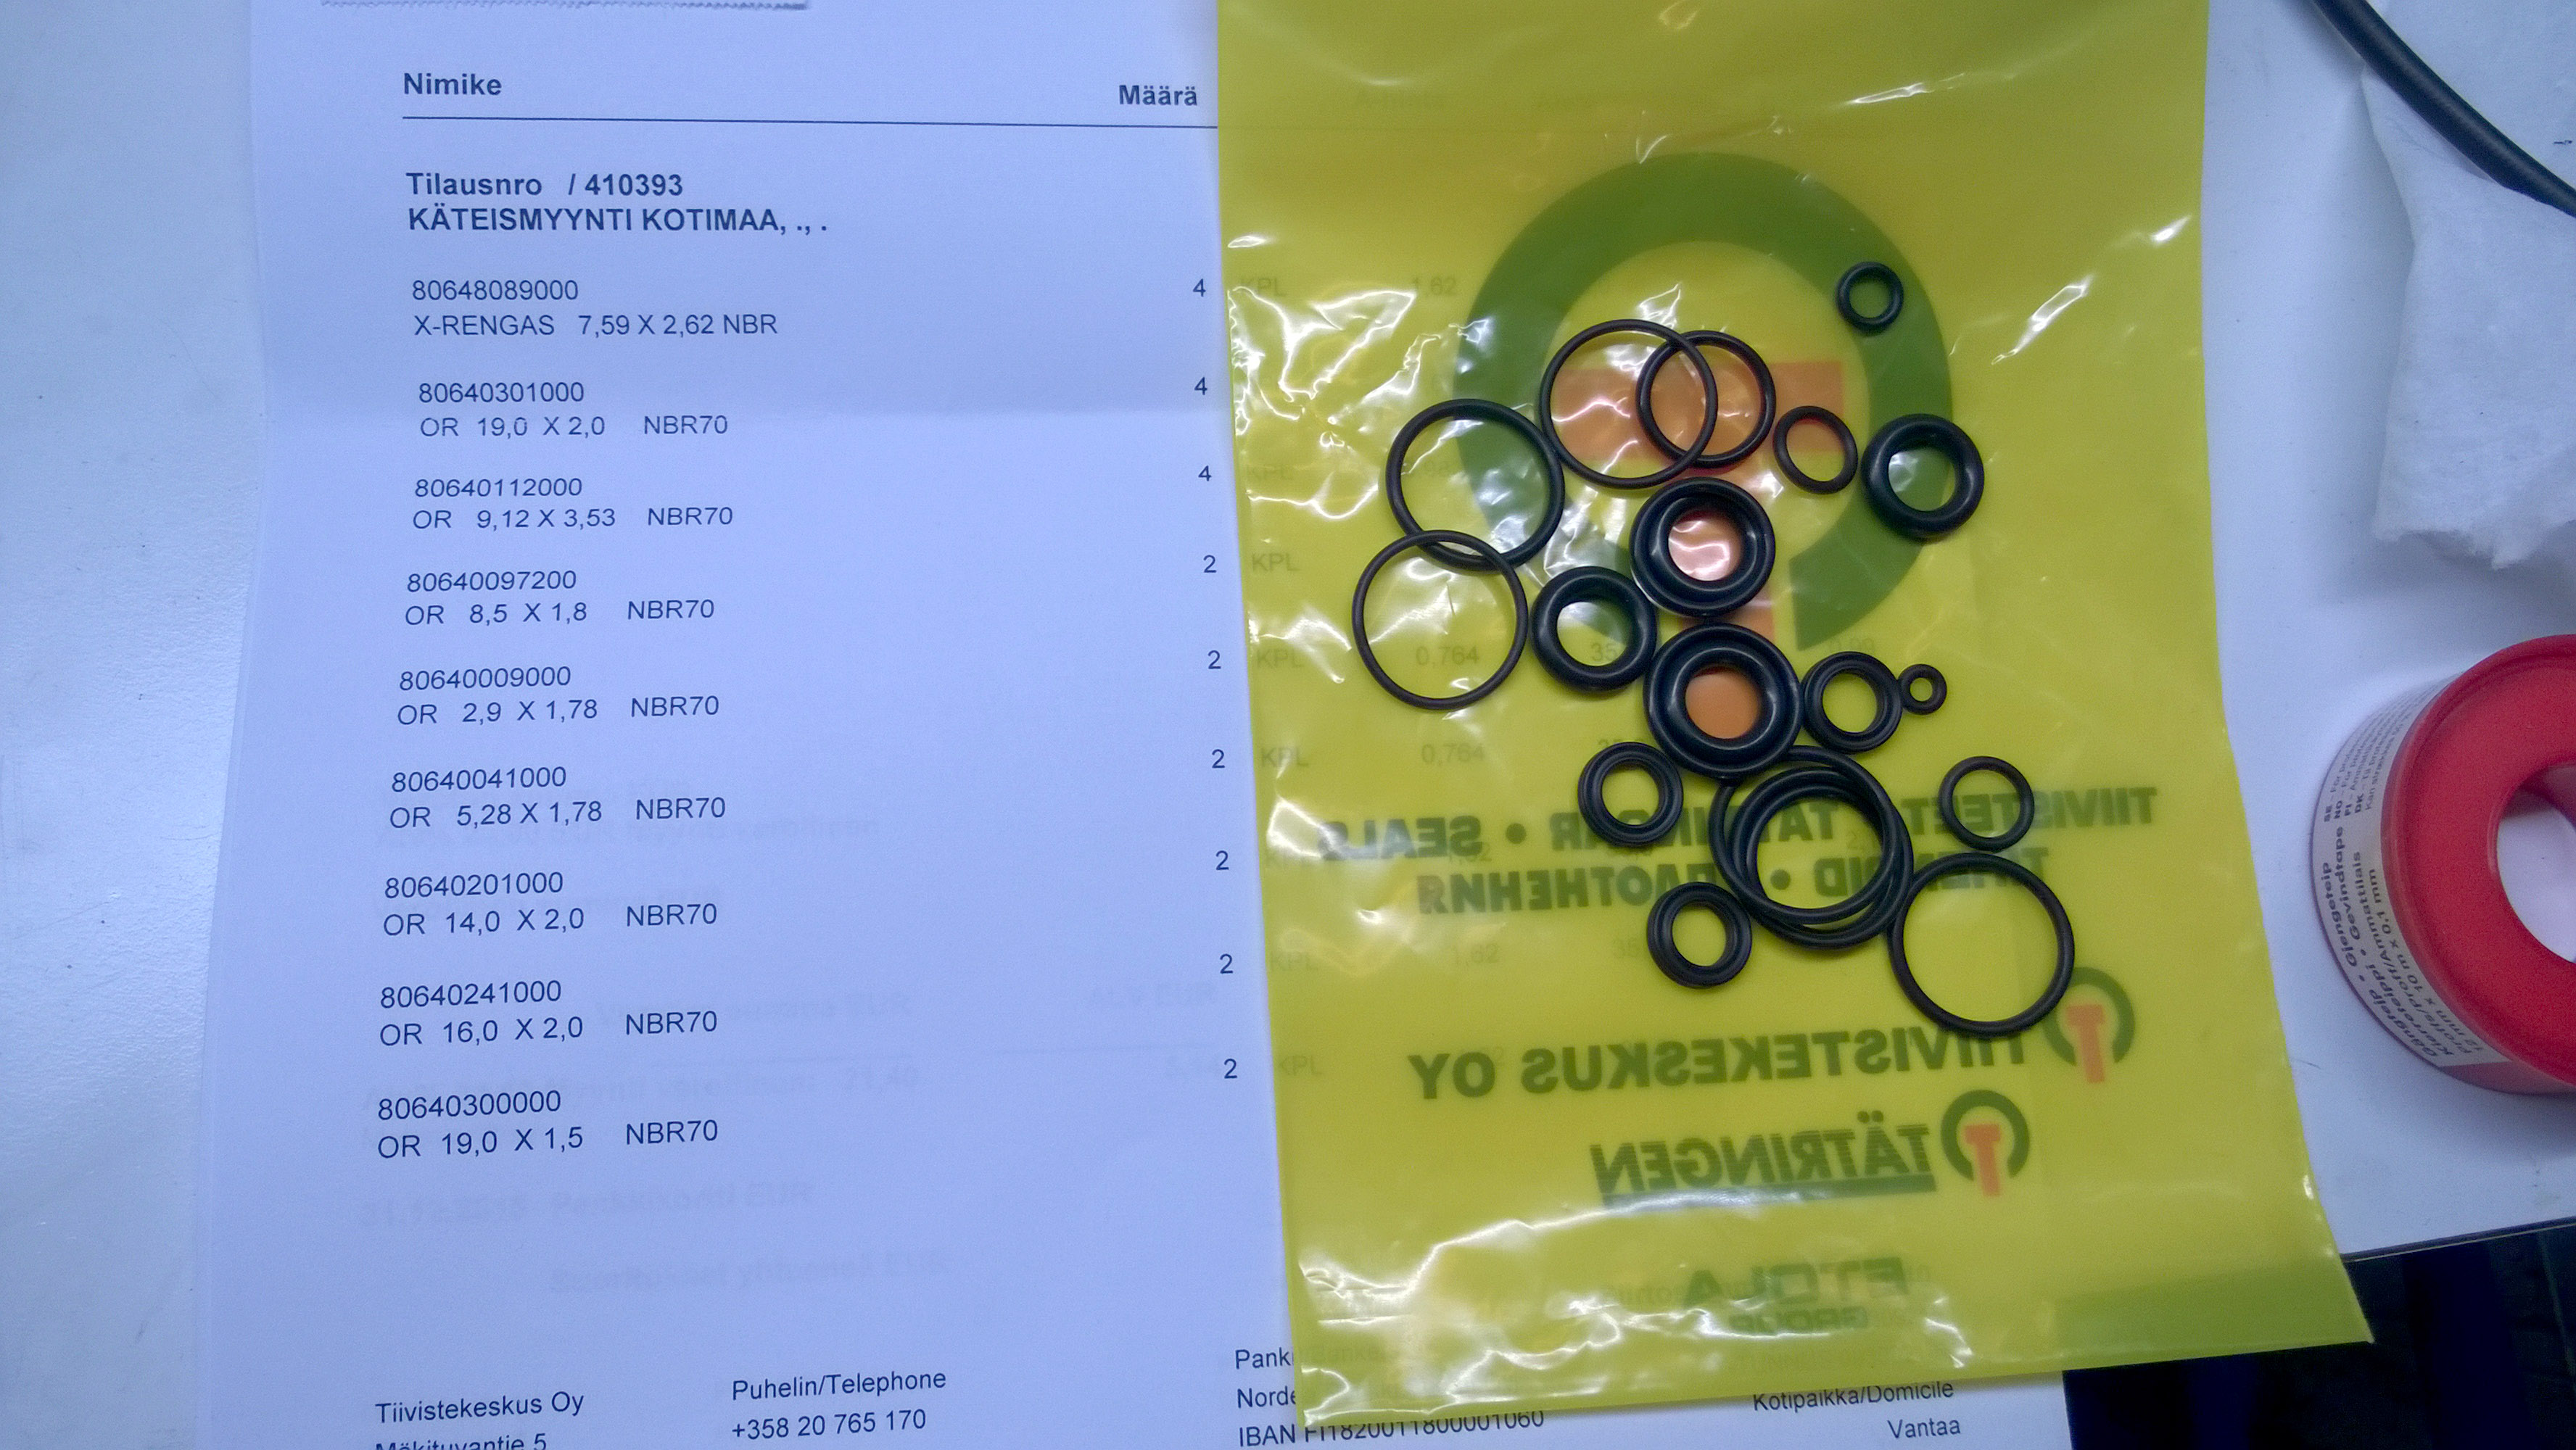
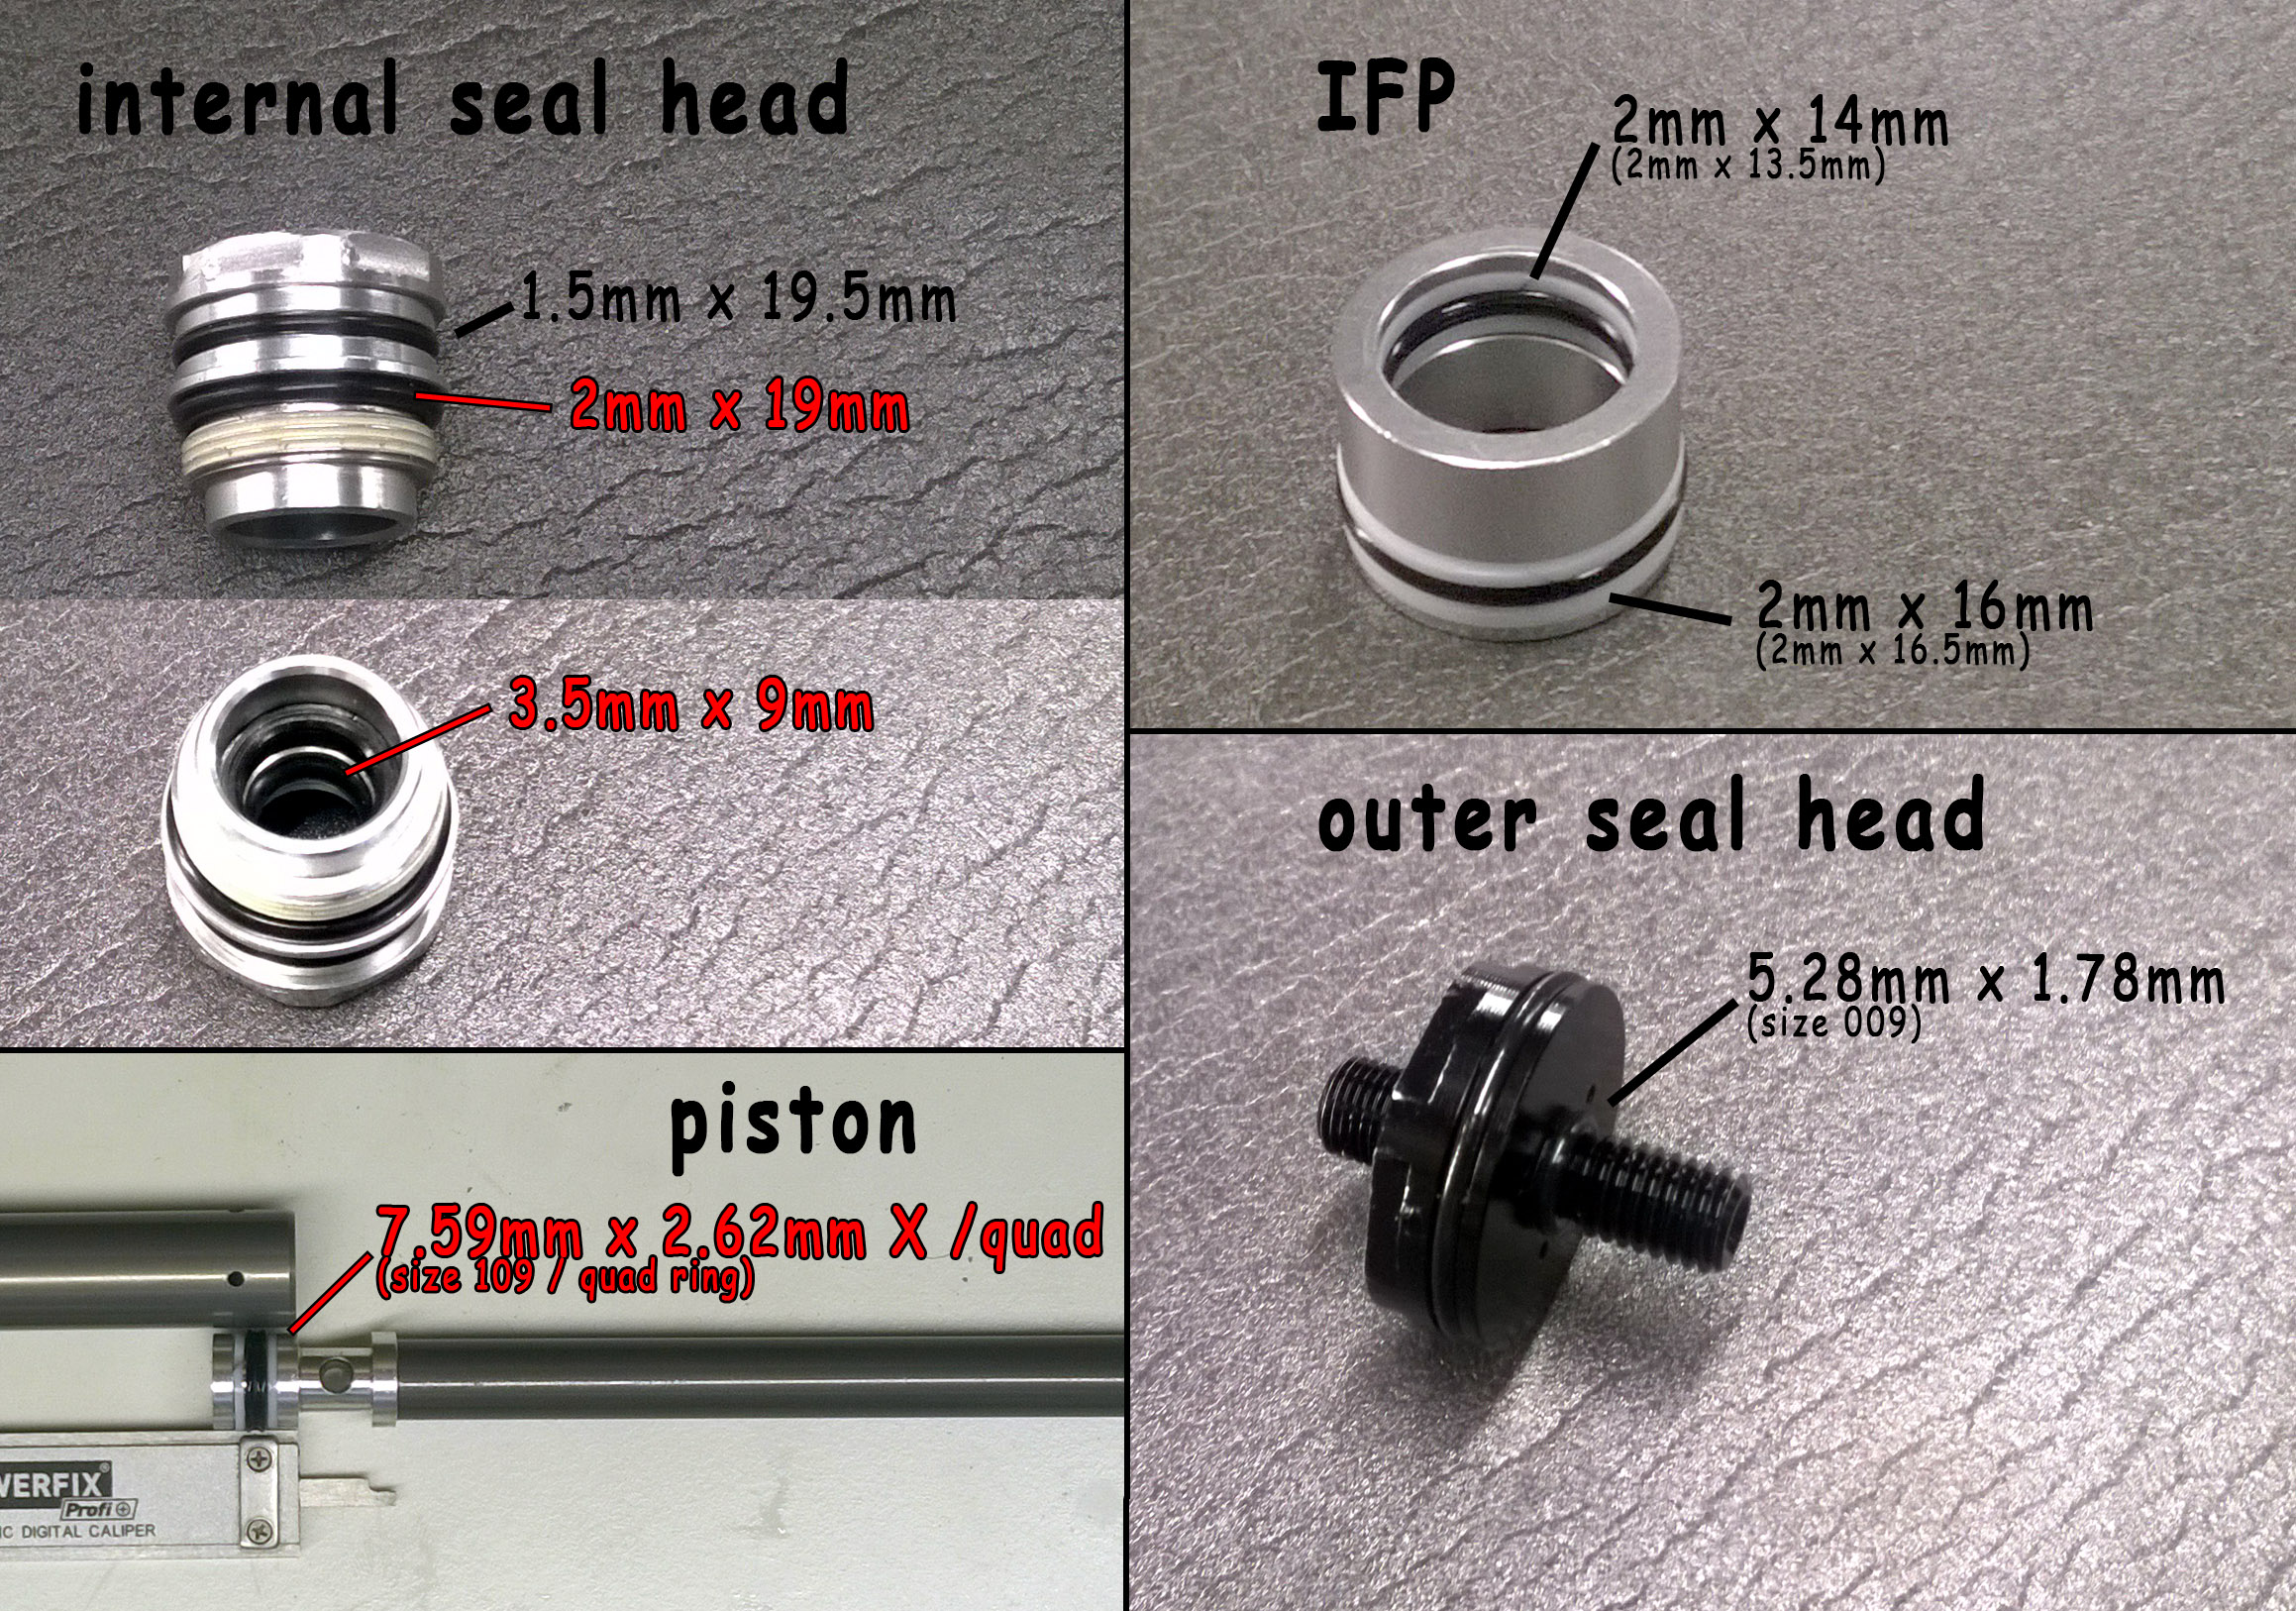
I didn’t have the official repair kit (or tools), but I found a picture of the most seals that usually go bad in mtbr forum:

I couldn’t find exactly the same seals, there were no 2 x 13.5mm and 16.5mm in local seal shop, but the clerk insisted that the 14mm internal and 16mm outer should be just fine.
I also came up with an idea that enables me to properly bleed the piston + IFP without any specific tools (except a makeshift IFP depth tool): I was to keep the remote in place, fill internals with oil, insert the IFP too deep so that when installing the piston (while holding remote down to open the valve), it will displace the IFP to correct depth.
NOTE: More details about the calculations and the full bleed procedure steps in Reverb_bleed_without_actual_bleed_tools.pdf
To determine the extra depth I calculated the inner tube and IFP tube (outer tube ID minus the inner tube OD) areas.
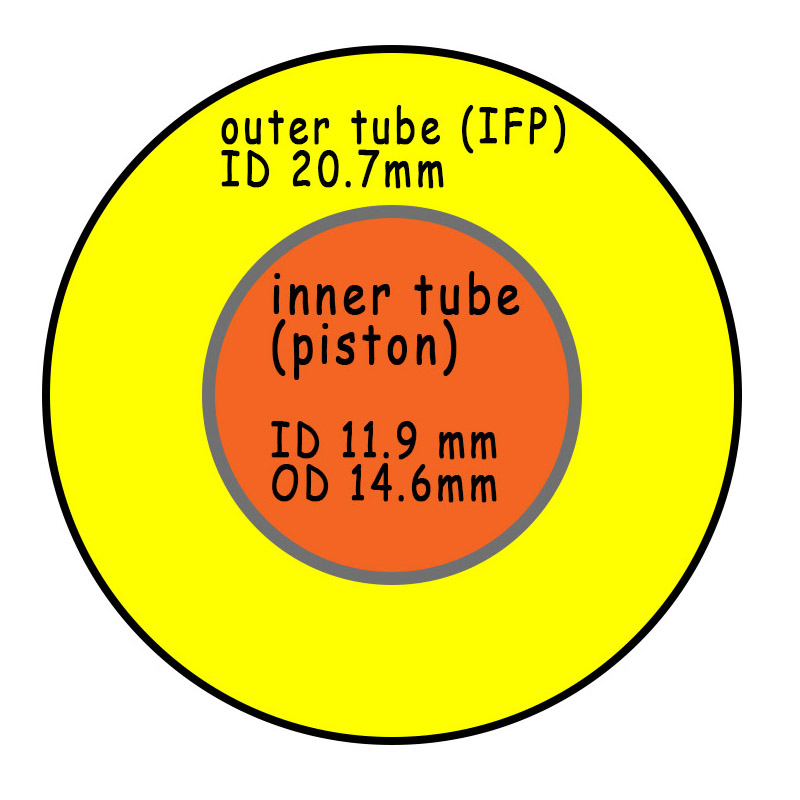
- inner tube area: 111.22 mm²
- IFP tube area: 169.12 mm²
I then inspected the interface between piston, inner tube and internal seal head to find out the displacement for the piston.
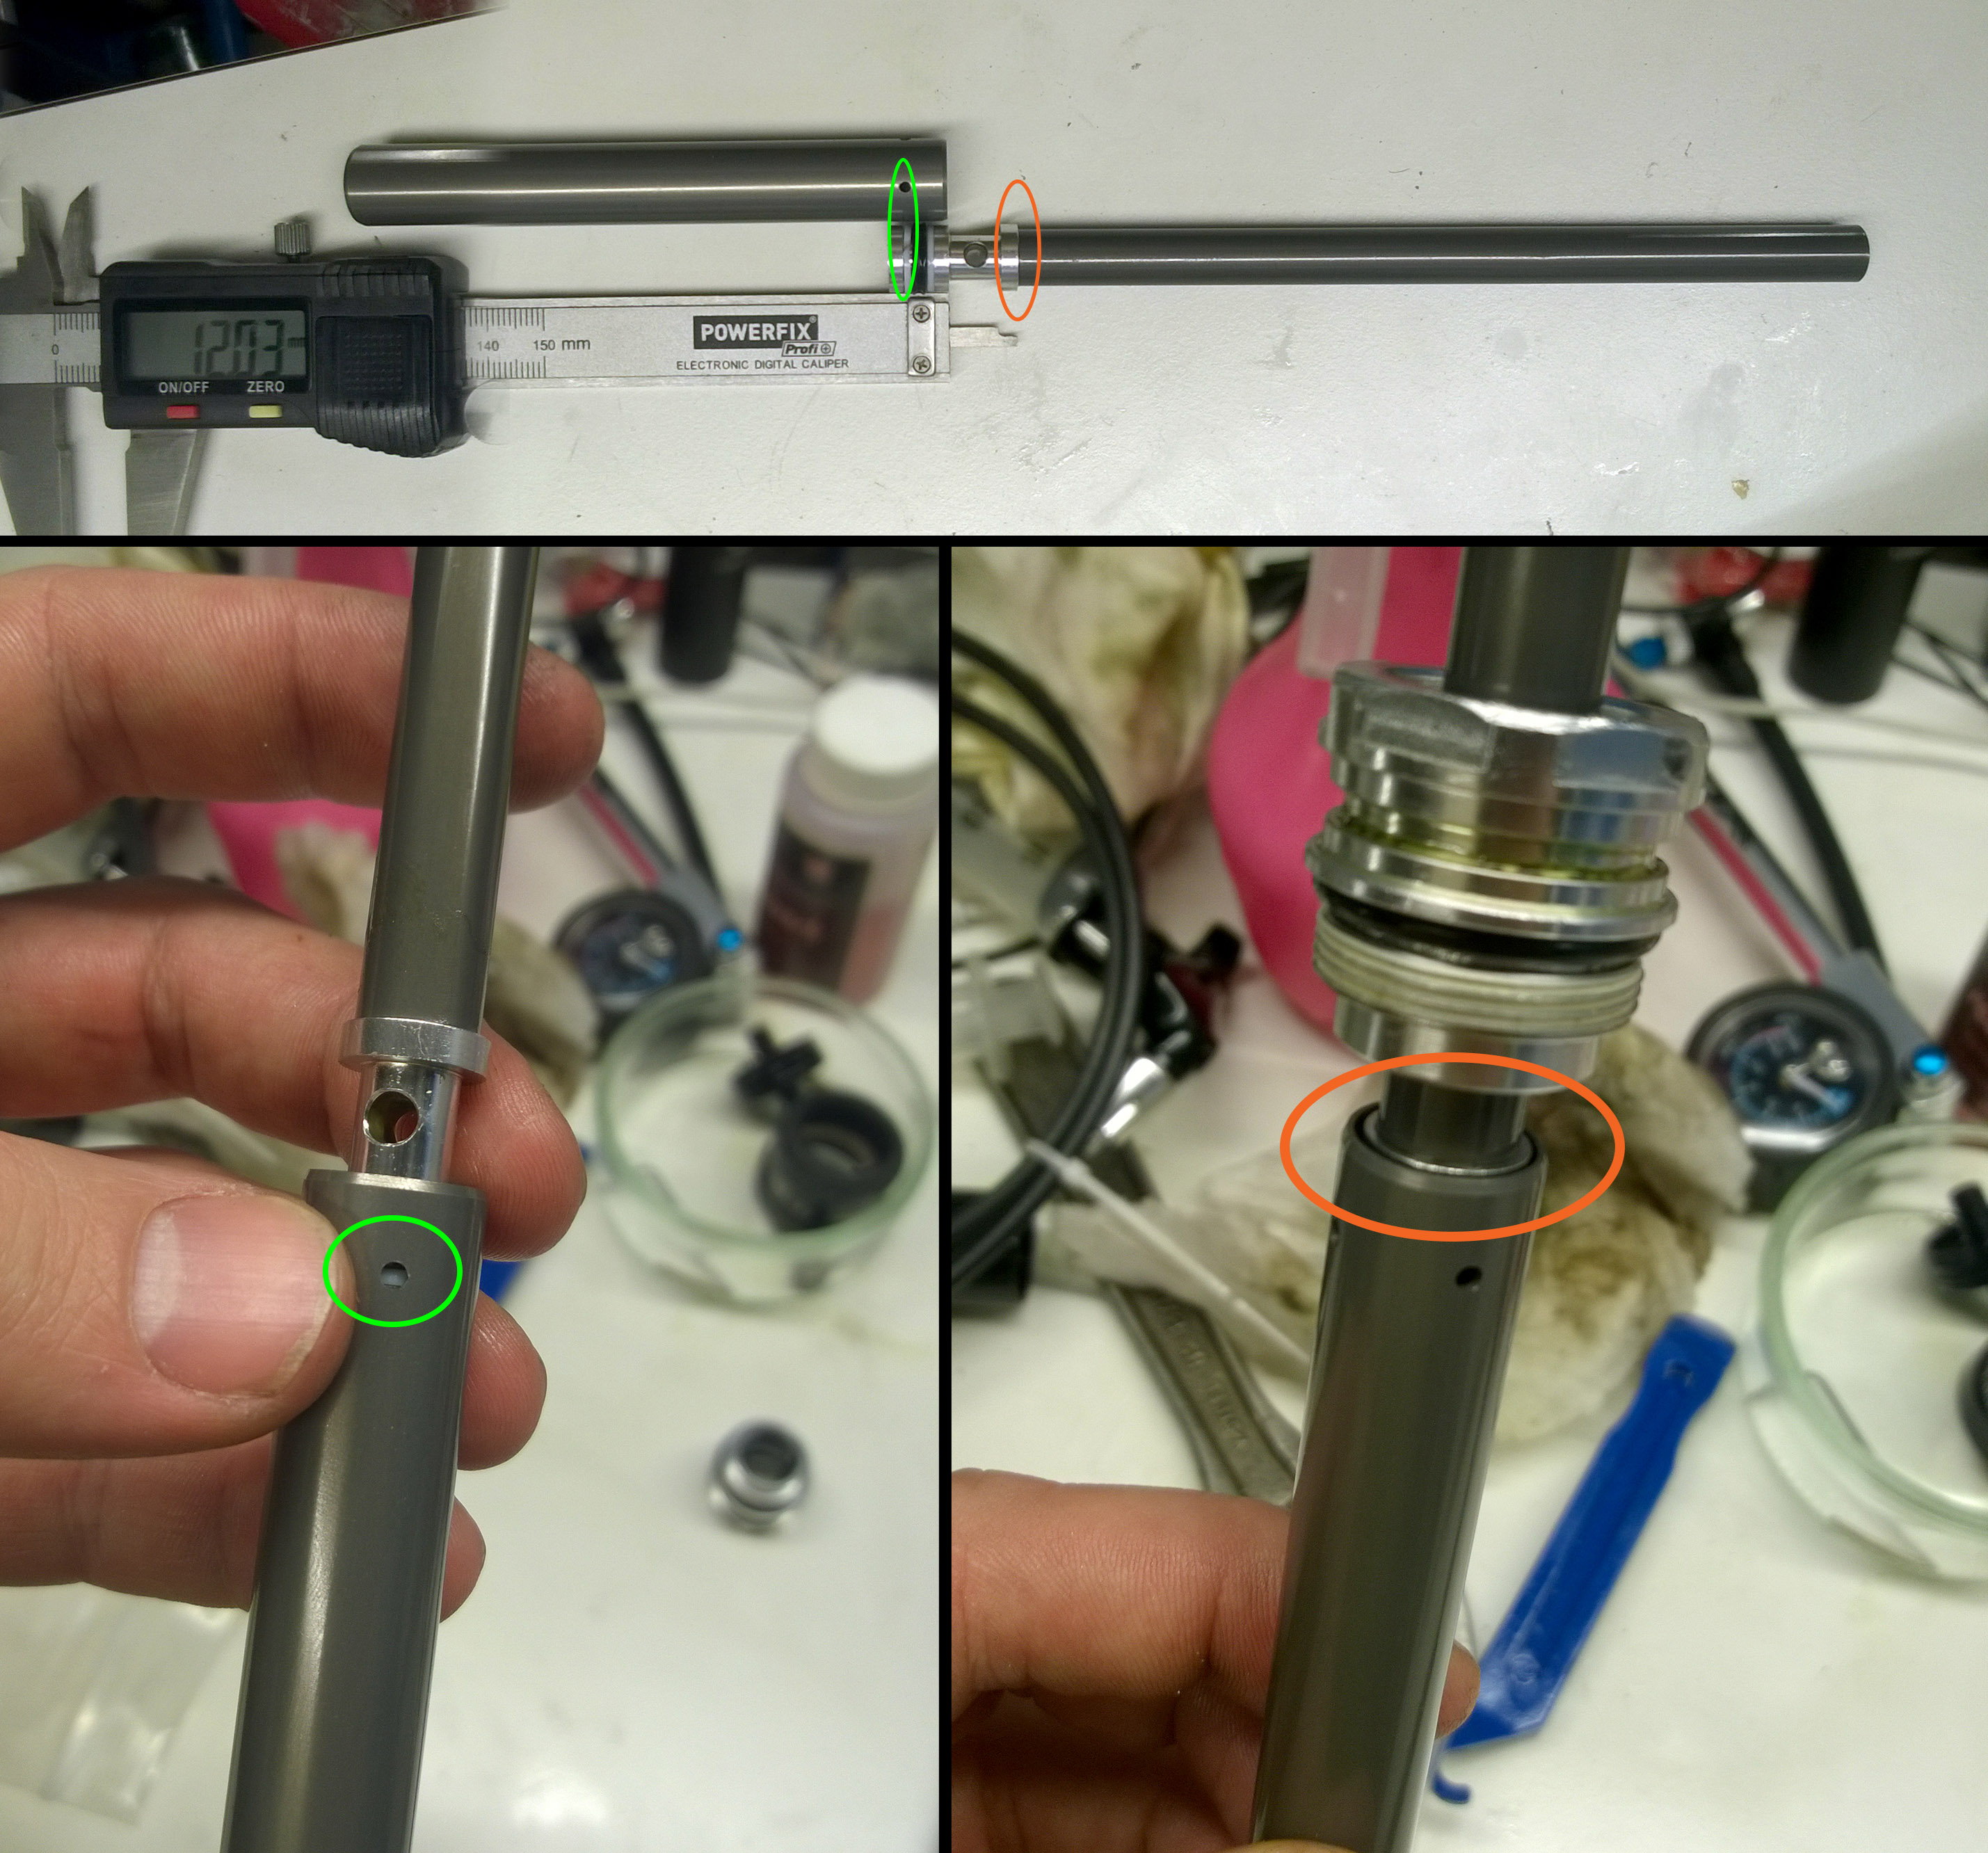
12mm of piston movement equals 1334.64 mm³ volume change in the inner tube (V = A*h) which in turn translates to 7.89mm movement ( h = V/A) in IFP tube –> the IFP is set 7.9mm deeper than desired final depth.
the IFP is set 7.9mm deeper than desired final depth.

Bleed procedure
NOTE: More details about the calculations and the full bleed procedure steps in Reverb_bleed_without_actual_bleed_tools.pdf
- Pop-it-open valve is in place
- Remote is properly bled
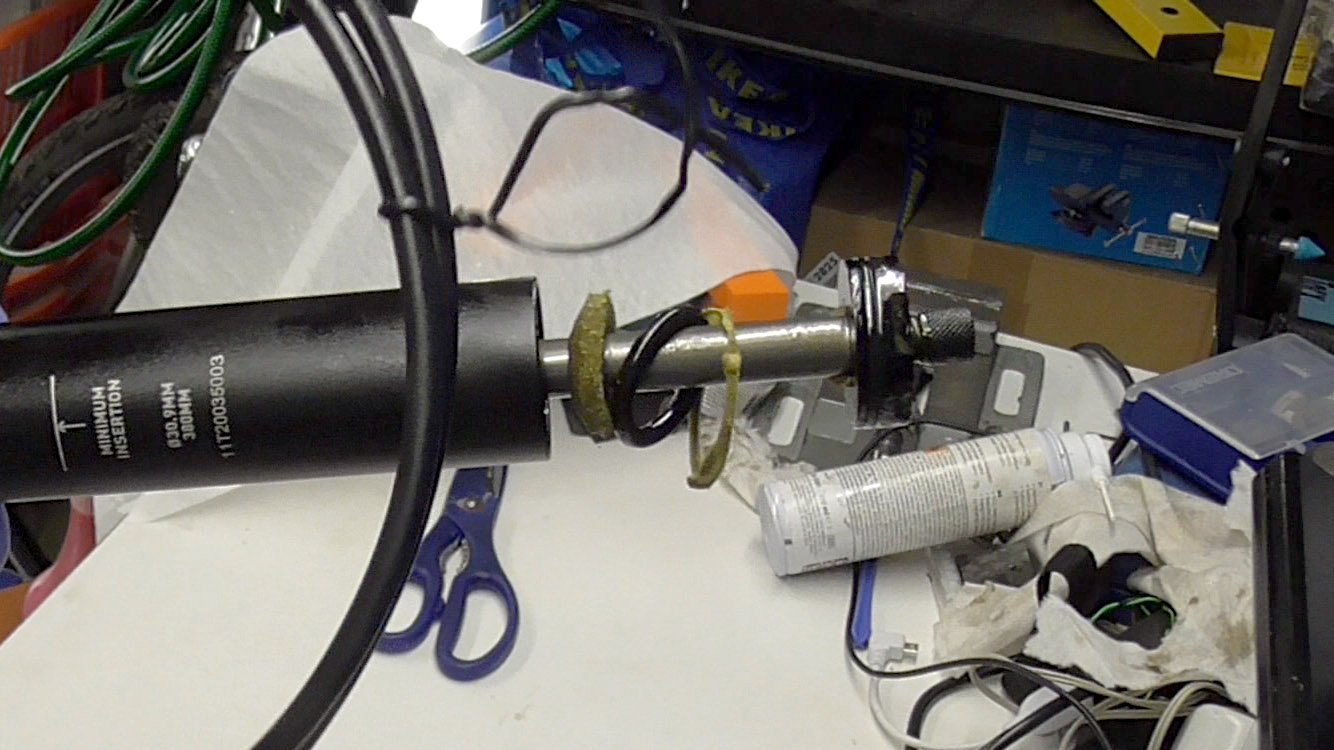
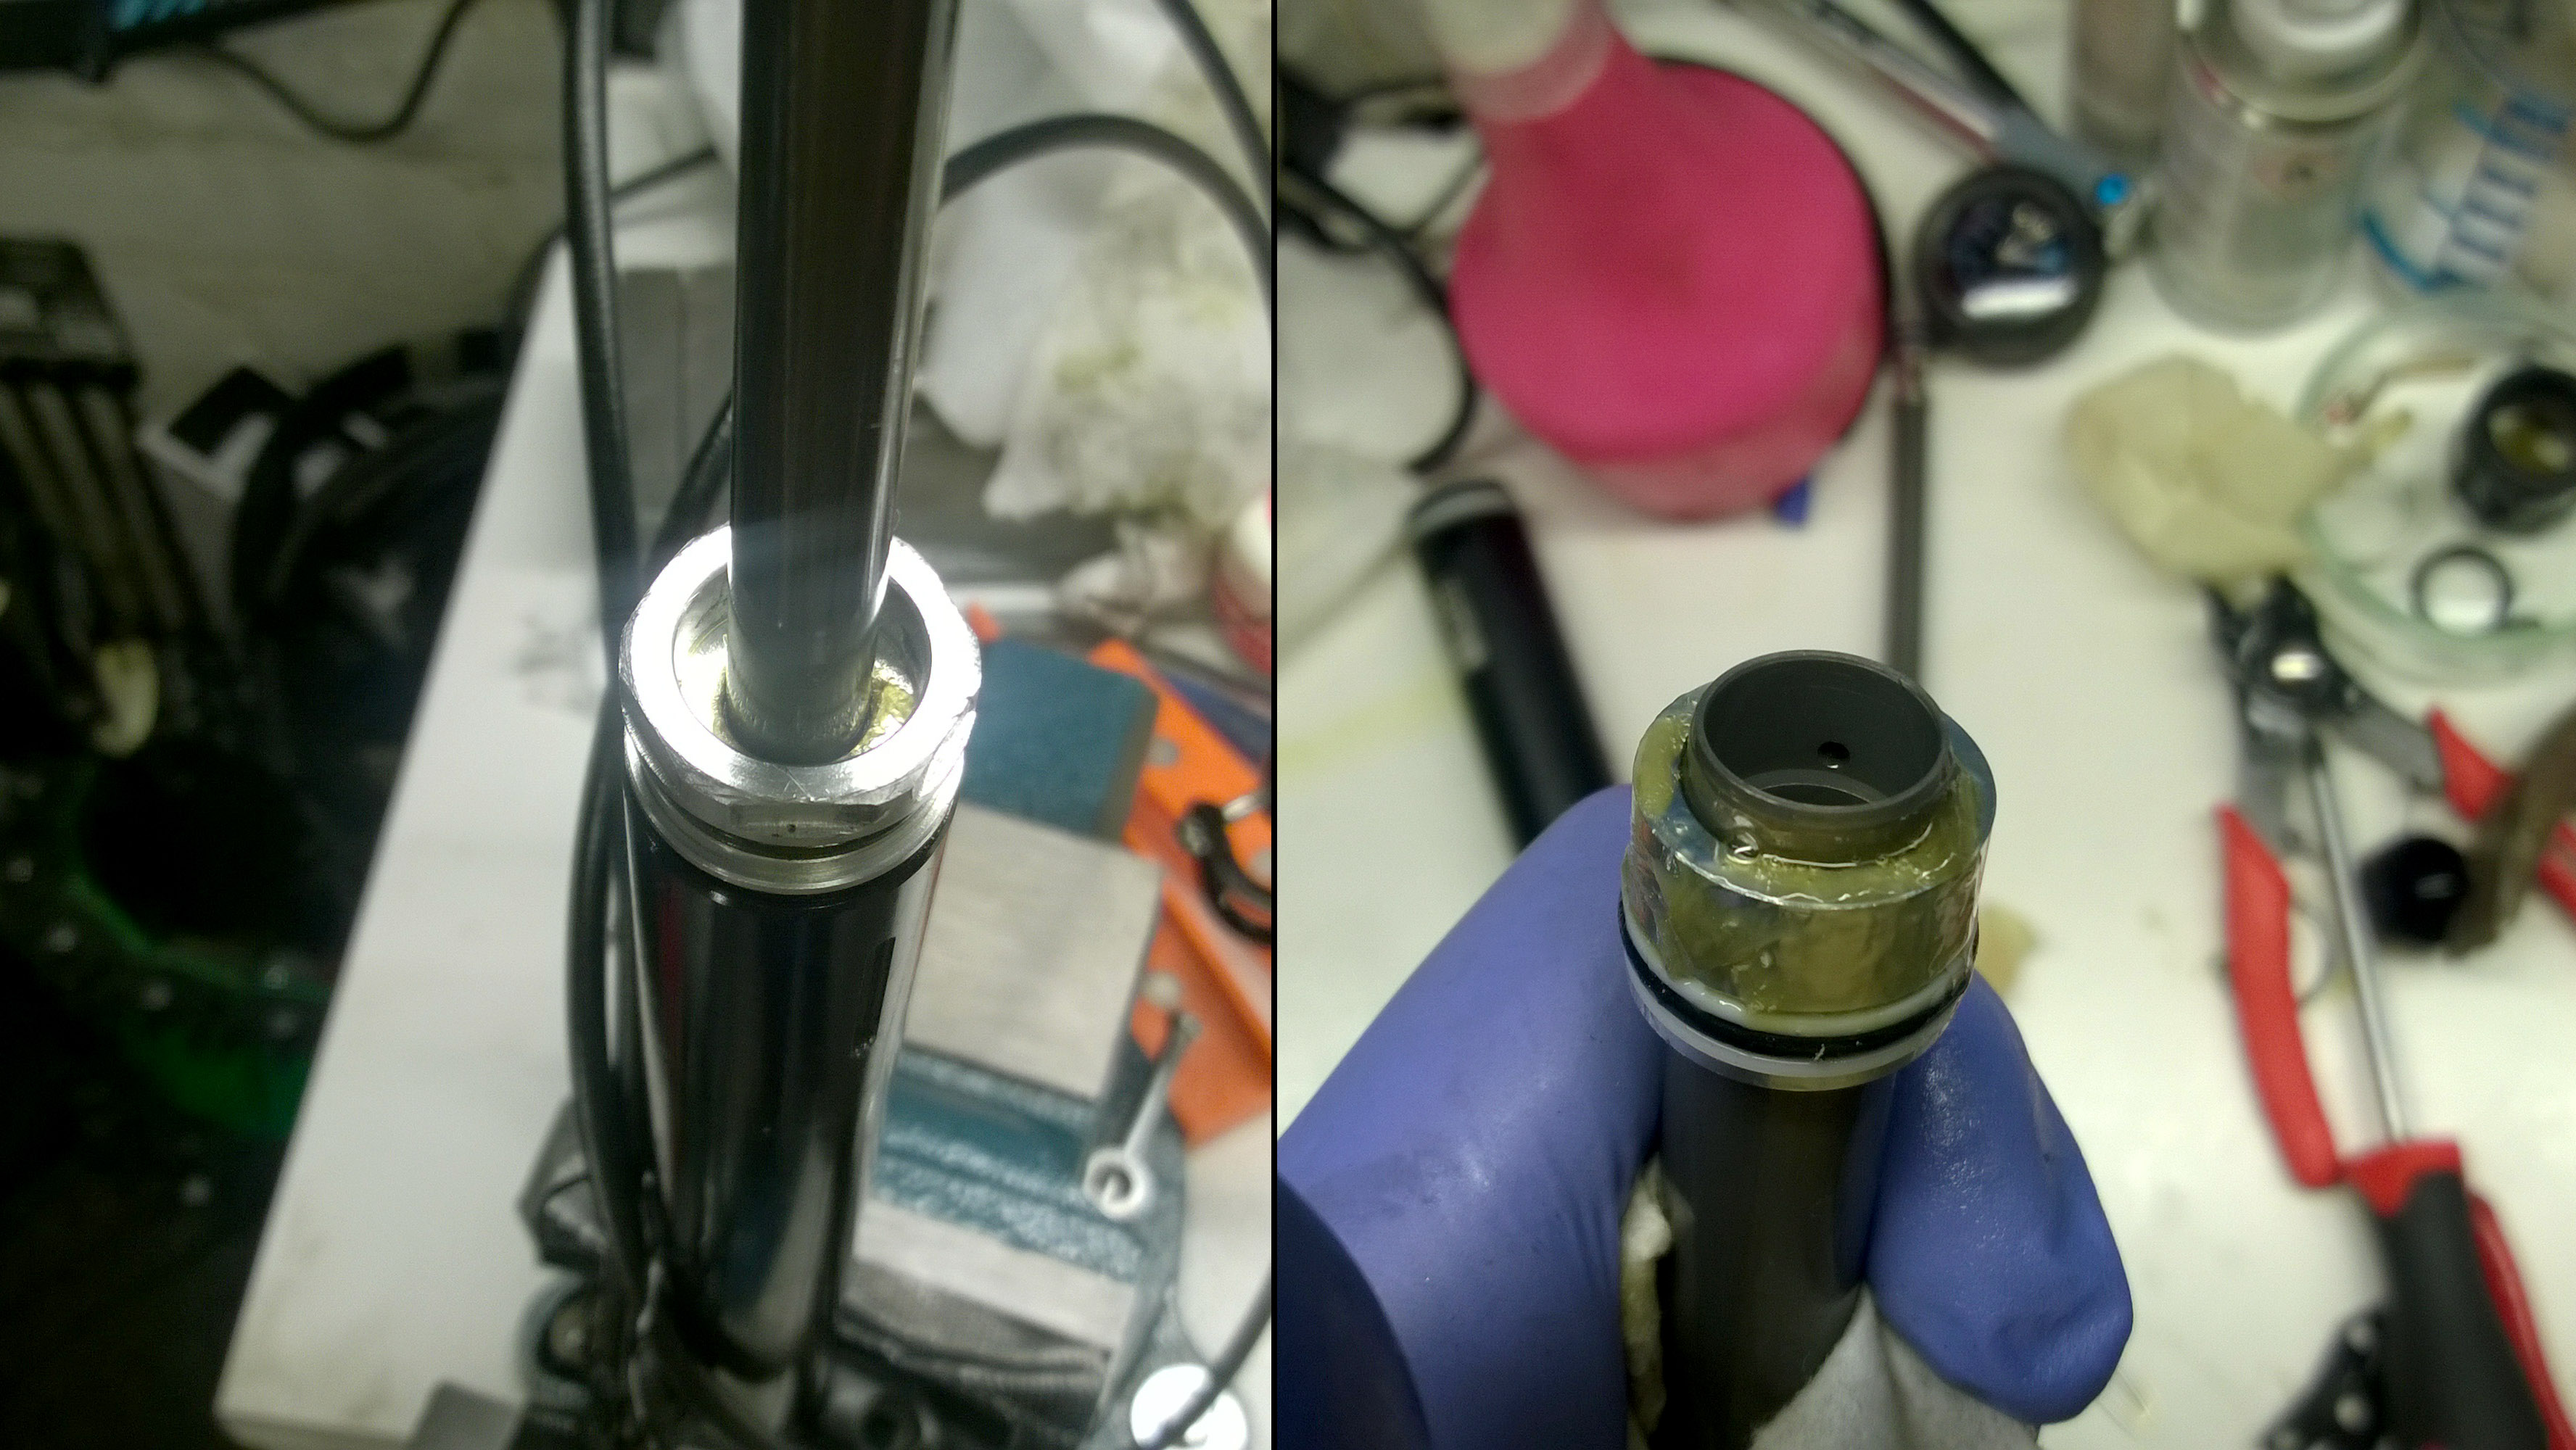
- Insert inner tube
- Fill with oil
- While pressing the remote to keep the pop-it-open valve open, press IFP into the initial depth
- Insert shaft piston into the upper post inner tube, first so that the seal engages and then press the remote to keep the pop-it-open valve open and keep inserting until the piston head stays just above the inner tube
- Pour the excessive oil out
- Slide the top cap on
- Thread the internal seal head into place, first by hand the press the remote to let the piston move and and tighten the head properly
- assemble the rest of the post

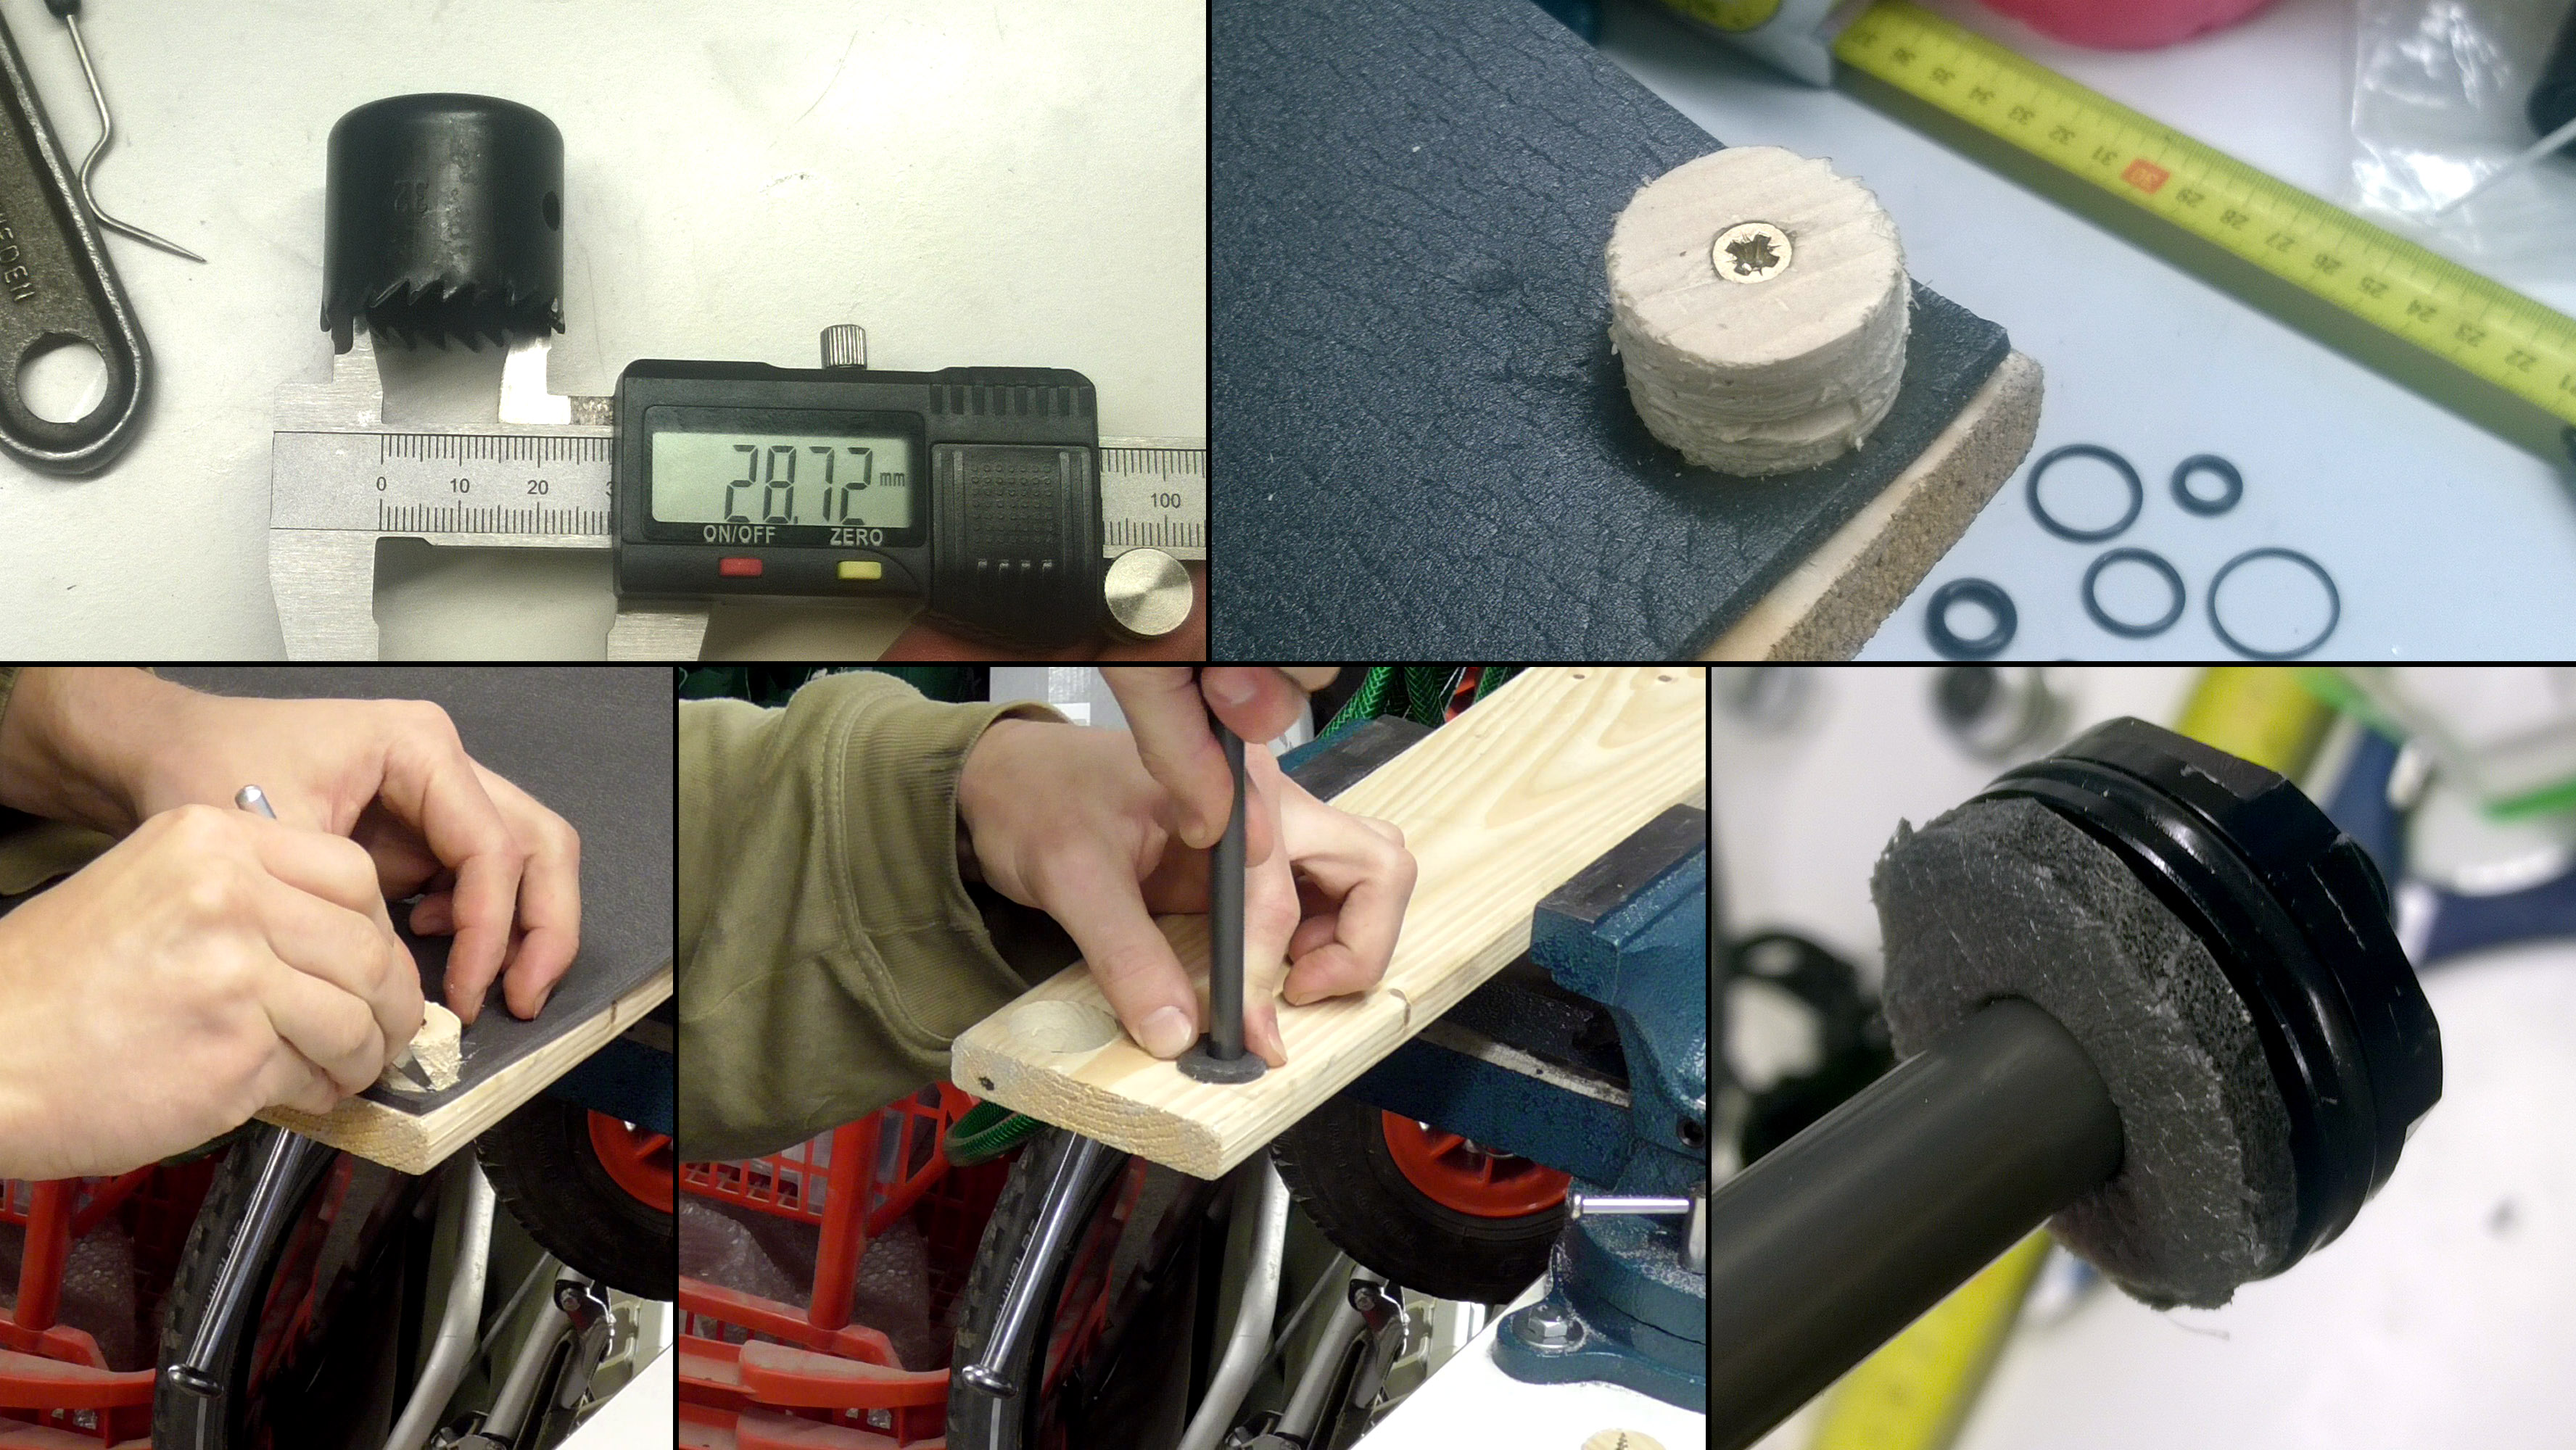
I couldn’t find any foam washers so I bought some sound dampening foam and used a 28mm ID hole cutter to create a stencil to cut the foam. After cutting the foam in shape I used the piston to press a hole for it.
Perfect !
Thanks for making notes of the sizes of the seals involved. I’m curious though, which seal do you think is most important for keeping air (and oil) in the post? It seems like when these things shit the bed, they usually do so by spewing oil out the bottom which indicate that adding air won’t do anything. This seems different from the “sagging” issue that most have. Mine for example doesn’t sag and has perfect extension, but I’m now starting my second rebuild (in 2 months) due to the oil/air coming out the bottom.
I wouldn’t worry much about the small amount of oil / air coming from the bottom if the post functions properly and without sag.
There are holes in the bottom plate to allow the air inside the lower post to escape to make room for the lowering upper post. I.e. air comes out every time you compress the post and goes back in when you extend it.
Small amount of oil/grease might be left from your assembly or leaked from IFP / main piston through the internal/lower seal head.
Again, I wouldn’t worry as long as the post has full extension and no sag.
Great post, will buy my seals from local dealer now on!
Thank you for sharing all that information. I’ve managed to fully rebuild my seatpost.
Glad to hear, it is always nice to hear that my article has helped someone in similar situation that I was before writing it 🙂 (although part of the compliment of course belongs to mtbr users as I got some of the info from there)
I will probably create an updated post as last time I didn’t service the pop-it-open valve and servicing it complicates my procedure a little. In the next rebuild I will also change the IFP to the latest and prettiest SKF version.
I’m looking at rebuilding mine since I can feel the ff:
– Not extending fully (~ 5mm left) – need to repress the button to get full extension
– At full extension the post squishes ~ 5mm
Given the above:
– Approximately how much hydraulic fluid I need to use?
– Is a full 120ml bottle enough (or more than enough) to perform a rebuild?
– Until which point do I need to rebuild mine? ie full rebuild or basic?
– Any idea what o-ring material does SRAM use? I’m planning on getting viton seals from a local shop as replacement as it’s known to be very durable…
Hi
The 120ml bottle is plenty enough for full rebuild, even to splatter around a little 😉
If there is sag (the post squishes when sit on) then you will need to do the full rebuild.
If you are going to use the same method that I did (without the rockshox bleed- and oil level tools), you should be very careful of the correct depth for the poppet valve. I am currently writing an updated guide for the depth and with the new 2017 IFP.
I think my replacement O-rings are NBR70 and I am not familiar with “viton seals”, at least make sure that they can take the oil and grease.
I am re building an old one that didn’t move at all anymore. It’s a 125mm 420mm Model but I can only use 90mm of travel. Since piston looked worn I went ahead and cut 35mm off, rethreaded it with 8mm x1.25 and added the correct chanfer for the o-ring to seal. (I didn’t have the right drill to make the original grove.) how critical is the correct depth for the IFP?
Thanks Bruno (who now owns a 23mm wrench)
Wow, quite heavy modification you got there 🙂
The IFP depth can cause limited extension: too shallow IFP and there is not enough oil to push the post fully up and too deep IFP will create progression when compressing the seatpost as the air volume is reduced by IFP & oil.
Just wanted to say thank you, T3mppu. I followed your instructions and was able to fix my A1 seat post without having to use bleed tool, and got full travel 🙂